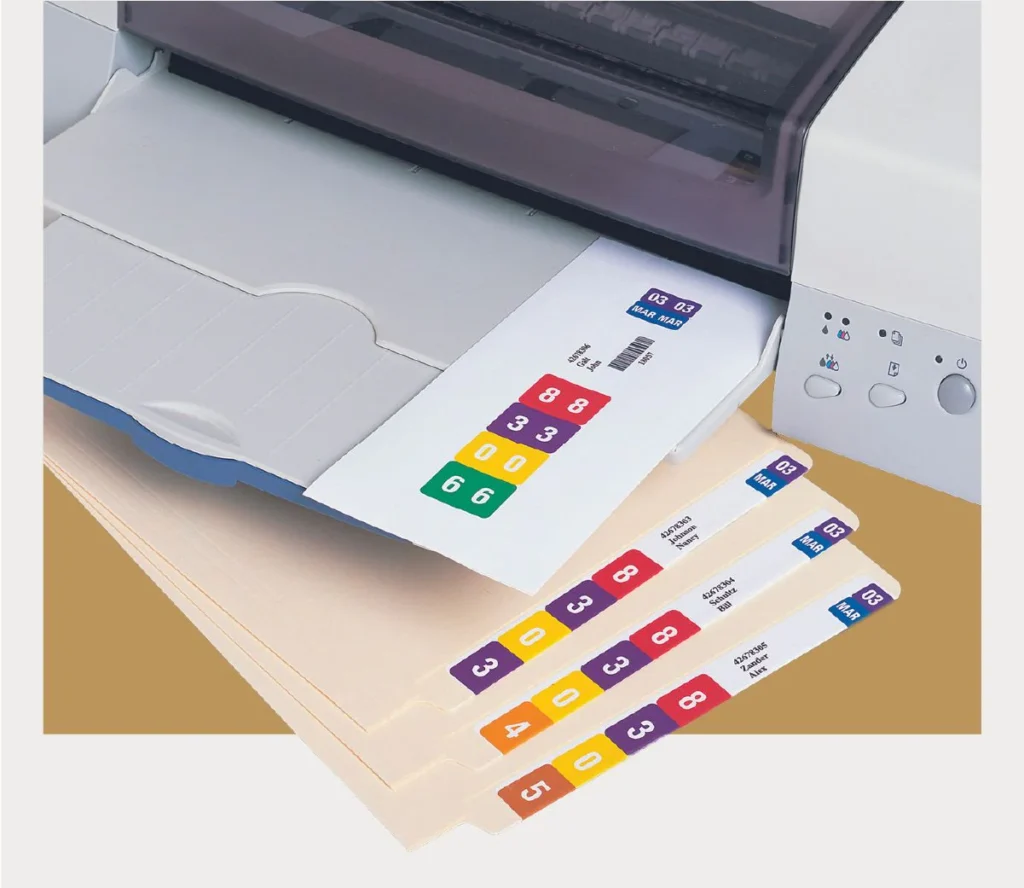
Replace NetLabels, TabQuick, ColorBar and ColorFlex Systems
File Label Printing Software Guide for Easy File Folder Label Creation, Import, and Printing
Learn how to log in, design labels, enter data, batch print, and align your output perfectly — from first login to finished label sheet.
Step 1
Logging In to the System
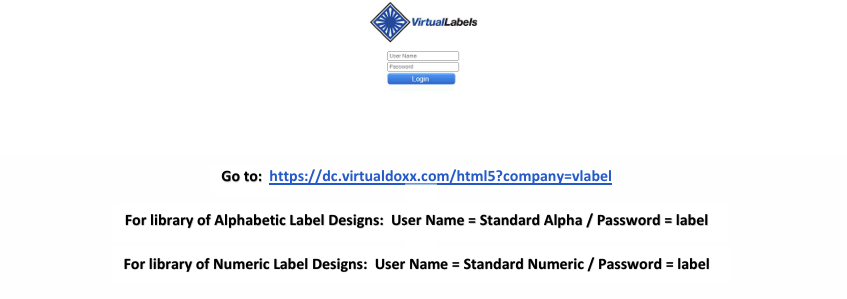
- Each User creates and is assigned a unique User Name and Password
- Customer Administrator(s) determine which label designs are accessible to each User
- Once a valid User Name and Password is entered, the User can enter data or import spreadsheet (.csv) data to print labels, limited to the Label Designs to which the User has access
Step 2
Selecting a Label Design
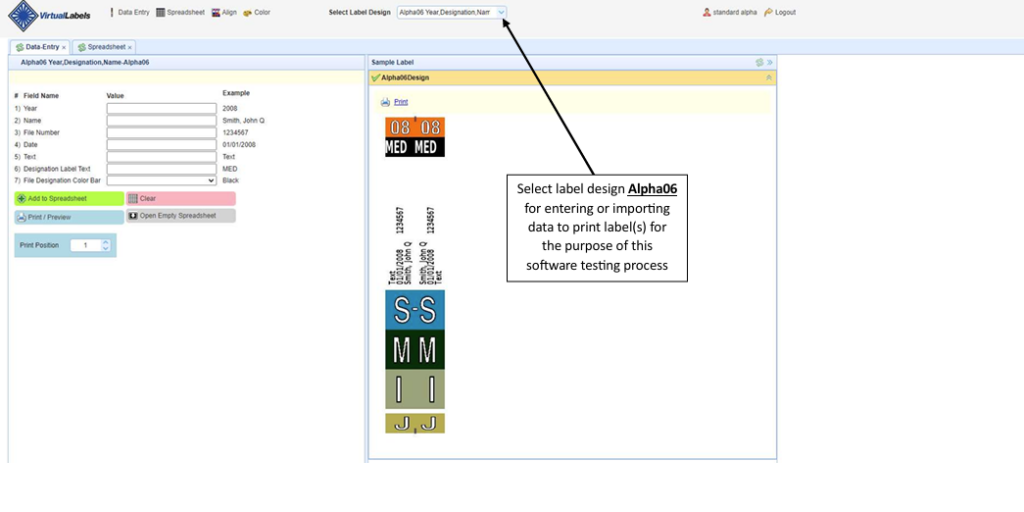
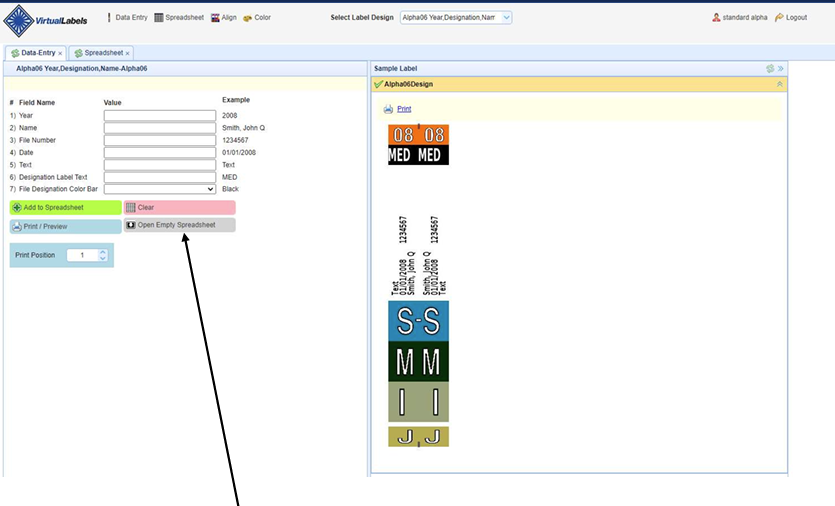
After logging in, you’ll see the Data Entry screen. Use the Select Label Design dropdown at the top to choose the label design you want to work with. Each design has customized data fields built to your organization’s specifications.
Step 3
Customized Data Fields and Drop-Down Lists
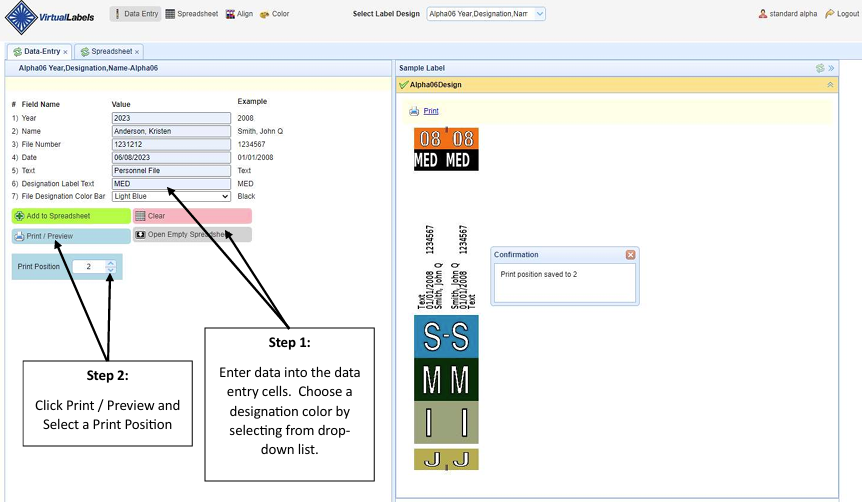
- Label designs include customized data entry screen with desired data fields and drop-down lists
- Enter data and select print posi on for the next available label posi on on a sheet of labels
- Once data is entered, label can be previewed and printed
Step 4
Label Print Preview and Printing
To print one label at a time, fill in the data fields on the Data Entry screen, select your print position, then click Print / Preview.
Step 5
Printing a Batch of Labels via Data Entry
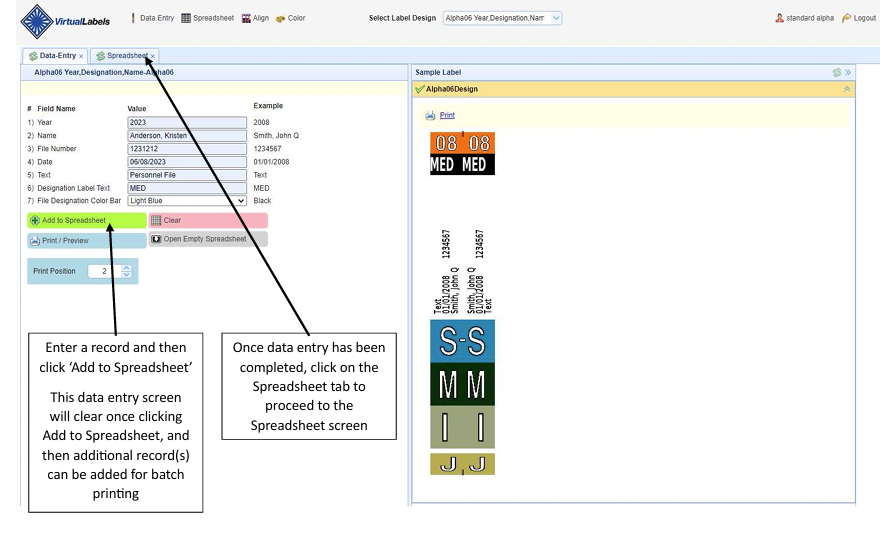
- After clicking Add to Spreadsheet , the data entry form clears automatically — ready for the next record
- Once all records are added, click the Spreadsheet tab to see all records as rows
- Click the spreadsheet refresher icon to display records, then click Print / Preview
Step 6
Using Microsoft Excel for Batch Data
- The Excel file opens with column headers matching your label design (Year, Name, File Number, Date, Text, Designation, Color Bar)
- Enter as many rows as needed — each row becomes one label
- When done, click File → Save As and save as .csv format on your computer
- The CSV is then ready to upload back to VirtualLabels
Step 7
Uploading Your CSV File
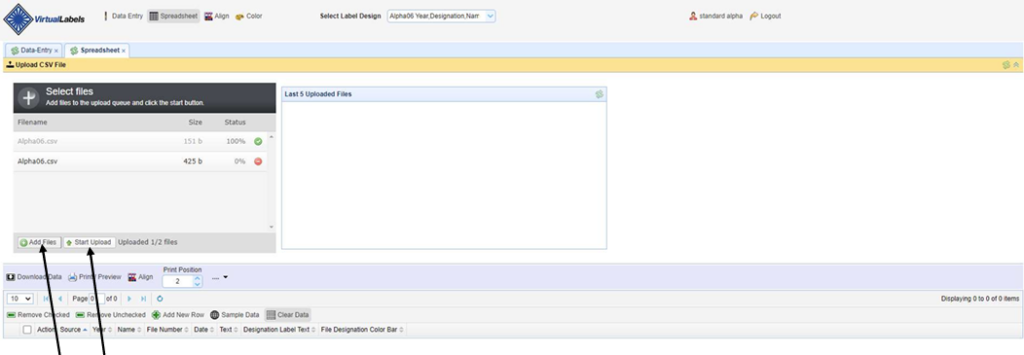
Switch to the Spreadsheet tab and click Upload CSV File at the top. Select your saved .csv file and click Start Upload — your records will appear instantly as rows in the spreadsheet.
- Click Add Files to navigate to and select your saved .csv file
- Click Start Upload — the file imports to VirtualLabels software immediately
- The spreadsheet displays all records from your .csv as individual rows
- You can edit any row by clicking the Edit link, or remove rows you don't want to print
- The system shows a list of the Last 5 Uploaded Files for quick re-access
Step 8
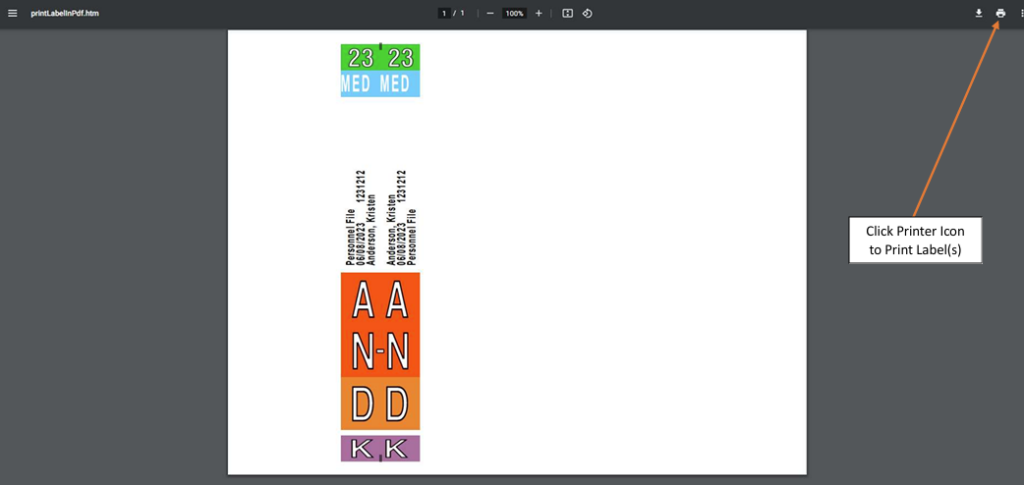
Preview and Print
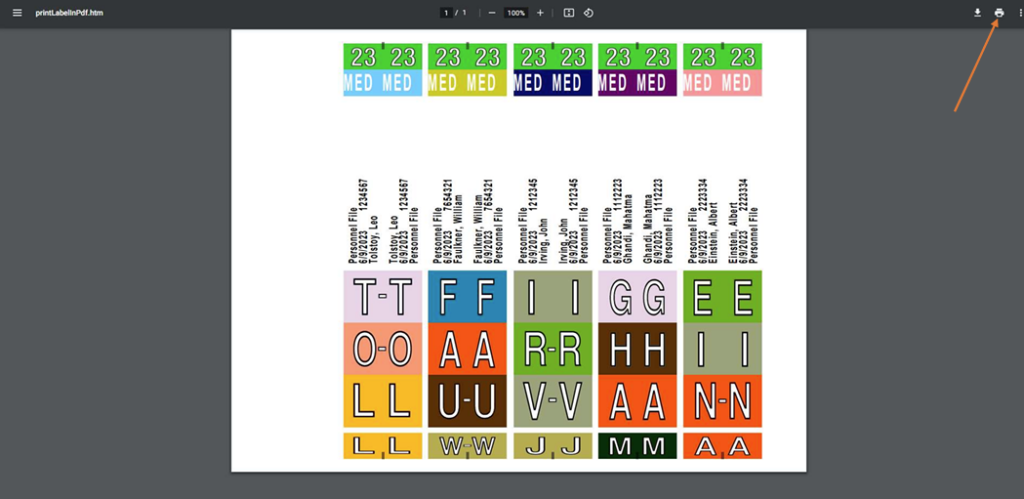
Click Print / Preview from either the Data Entry or Spreadsheet screen. A PDF preview opens showing exactly how your labels will print — one label per record, laid out on your label sheet. Then click the printer icon to send to your printer.
- The PDF preview renders exactly as the labels will appear when printed
- Each row of data in your spreadsheet becomes one label in the preview
- Click the printer icon in the top-right of the PDF viewer to print
- You can also click the download icon to save the PDF for record-keeping
Step 9
Label Alignment Software Wizard
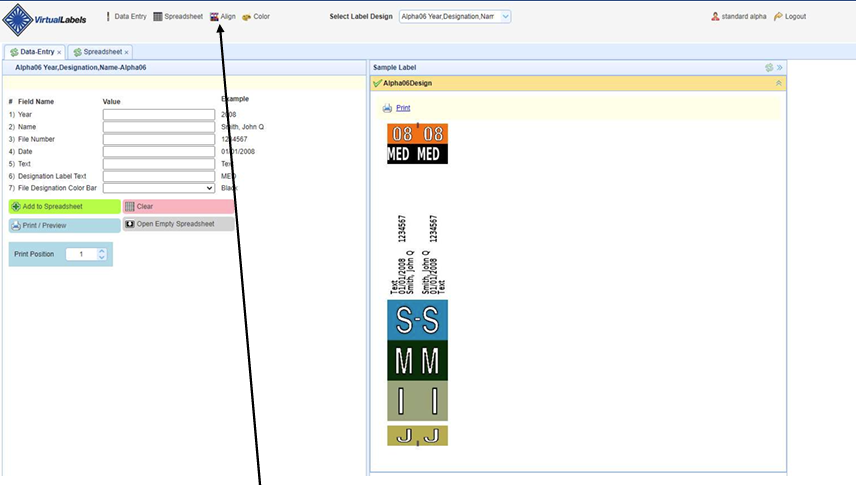
If your labels print slightly off-center from the die-cut positions on the sheet, use the Alignment Wizard. Click the Align button in the toolbar to access it.
- The PDF preview renders exactly as the labels will appear when printed
- Use the Left/Right Print Adjustment and UP/DOWN Print Adjustment panels to fine-tune
- Adjustments can be made in inches, millimeters, or pixels — whatever feels natural
- Once set, alignment is saved for your account so you only need to calibrate once per printer

Frequently Asked Questions (FAQs)
How does File Label Printing Software make label creation easier?
File Label Printing Software gives users a ready system to enter file data, choose a label design, preview the label, and print it. This reduces manual formatting work and helps teams create consistent file labels every time.
Can File labelling print software print labels in bulk?
Yes, VirtualLabels File labelling print software can support batch label printing. Users can add multiple file records into the system and print several labels together instead of creating each label manually one by one.
Does File Folder Label Printing Software support Excel or CSV uploads?
Yes, VirtualLabels File Folder Label Printing Software can use CSV data prepared from Excel. Each row in the uploaded file becomes a separate label, which helps users print large numbers of file labels faster.
How does Label Design Software support custom label formats?
Label Design Software allows each label format to include specific data fields based on the organization’s filing needs. These fields may include file numbers, names, dates, departments, designations, and color-coded sections.
Why is Color-Coded File Label Software useful for records?
Color-Coded File Label Software helps users identify files quickly by using color bars or color sections. This is useful for busy record rooms, offices, legal files, medical records, and archive storage areas.
Can Barcode Label Printing Software be used for file tracking?
Yes, VirtualLabels Barcode Label Printing Software can help create labels with barcode information for file identification. These barcode labels can support faster scanning, better record control, and easier file tracking.
Does RFID Label Printing Software help with advanced file tracking?
RFID Label Printing Software can support file labels that include RFID-based identification data. This is useful for organizations that want to connect physical file folders with digital tracking systems.
How does Label Printer Software help before final printing?
Label Printer Software provides a print preview before sending labels to the printer. This allows users to check spacing, data placement, color bars, and label layout before printing the final sheet.
Can users print a single file label when needed?
Yes, users can print one file label by entering the required file information and selecting the label position. This is helpful when only one new folder or record needs to be labelled.
Why should businesses use File Label Printing Software instead of manual labels?
Manual labels can lead to inconsistent formatting, typing mistakes, and slow printing work. VirtualLabels File Label Printing Software gives teams a faster and more organized way to create accurate file folder labels.
Ready to replace NetLabels, TabQuick, ColorBar or ColorFlex?
We setup the file label printing software with one or more label designs at no upfront fee. Your
staff can fully test the system to ensure that everything performs properly, risk-free and with no
obligation. Software and label design(s) setup typically takes about 24 to 48 hours.